- Lavelle Road, Bangalore
- contact@basofa.com
Production Ready Previews
3. Supplier Communications Agent
Features Enabled in D365F&O
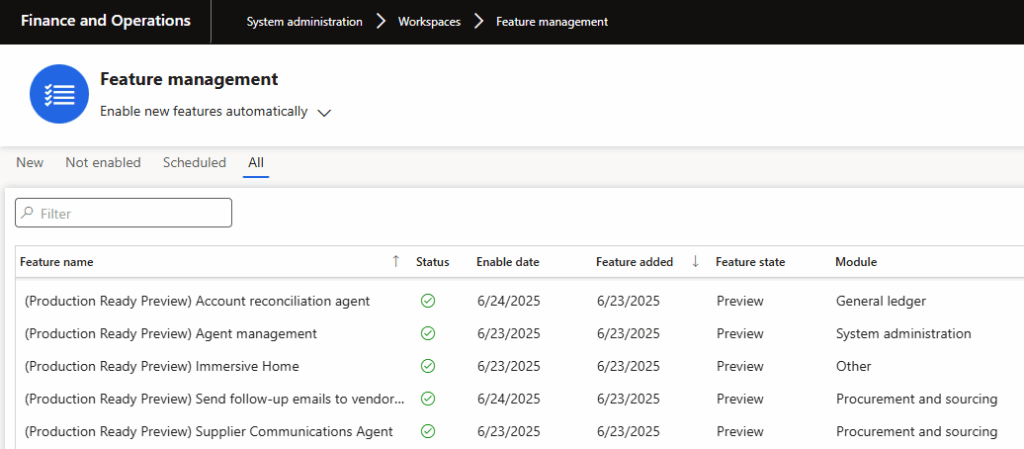
1. In the Power Platform admin centre,
• Copilot for finance and operations apps version 1.0.3048.2 or later. updated it to the latest version.
• Copilot in Microsoft Dynamics 365 Supply Chain Management version 1.1.03071.1 or later. updated it to the latest version.
Add the agent identity user both to the Dataverse environment and to Supply Chain Management. Assign the agent identify user the security roles shown in the following lists.
2. Required Dataverse User Roles
• Finance and Operation Basic User

• Supplier Communications Agent

• Environment Maker

3. Required Supply Chain Management user roles:
• Supplier Communications Agent
• System user
Create The Required Connections
To create the required connections, follow these steps.
1. Open the Power Apps Maker portal and sign in as an environment administrator user.
2. Use the Environment drop-down list in the page header to select the environment associated with your finance and operations apps.
3. In the left navigator, select Connections.
4. At the top of the page, select new connection.
5. Use the Search field at the right side of the page to find the connection with a Name of Microsoft Dataverse (if you see two, use the one with the green icon). Select Create for that row and follow the instructions on your screen. Sign in with the intended agent identity user when prompted.
6. You return to the Connections list. Your new connector is now shown at the bottom of the list and is named after the agent identity you signed in with when creating it.
7. At the top of the page, select new connection.
8. Find the connection with a Name of Microsoft Copilot Studio. Select Create for that row and follow the instructions on your screen. Sign in as the intended agent identity when prompted.
9. You return to the Connections list. Your new connector is now shown at the bottom of the list and is named after the agent identity you signed in with when creating it.
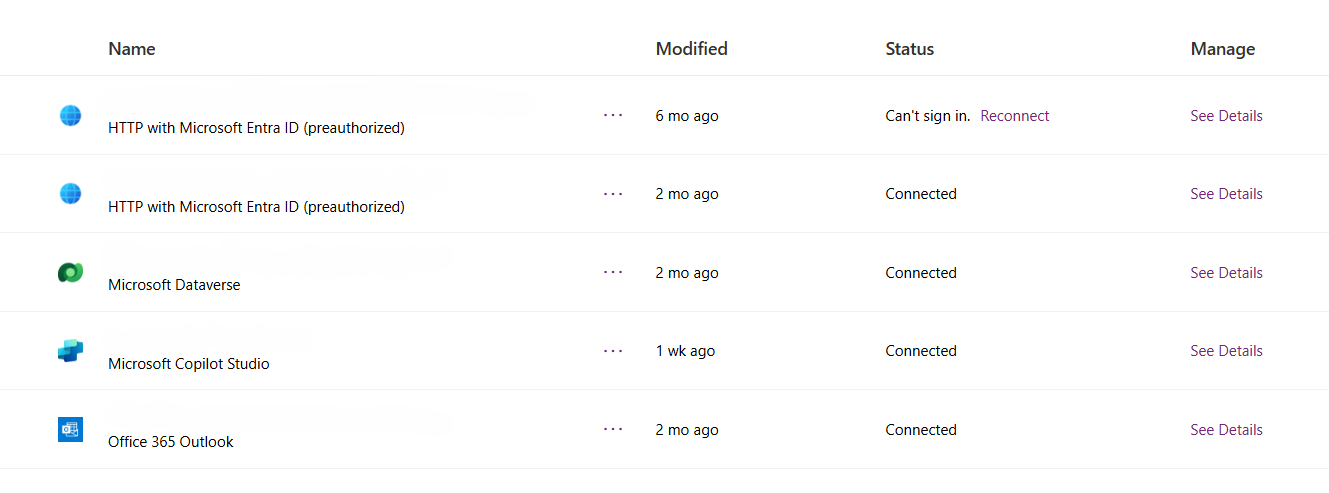
Activating Power Automate Flows to Complete Agent Identity Setup
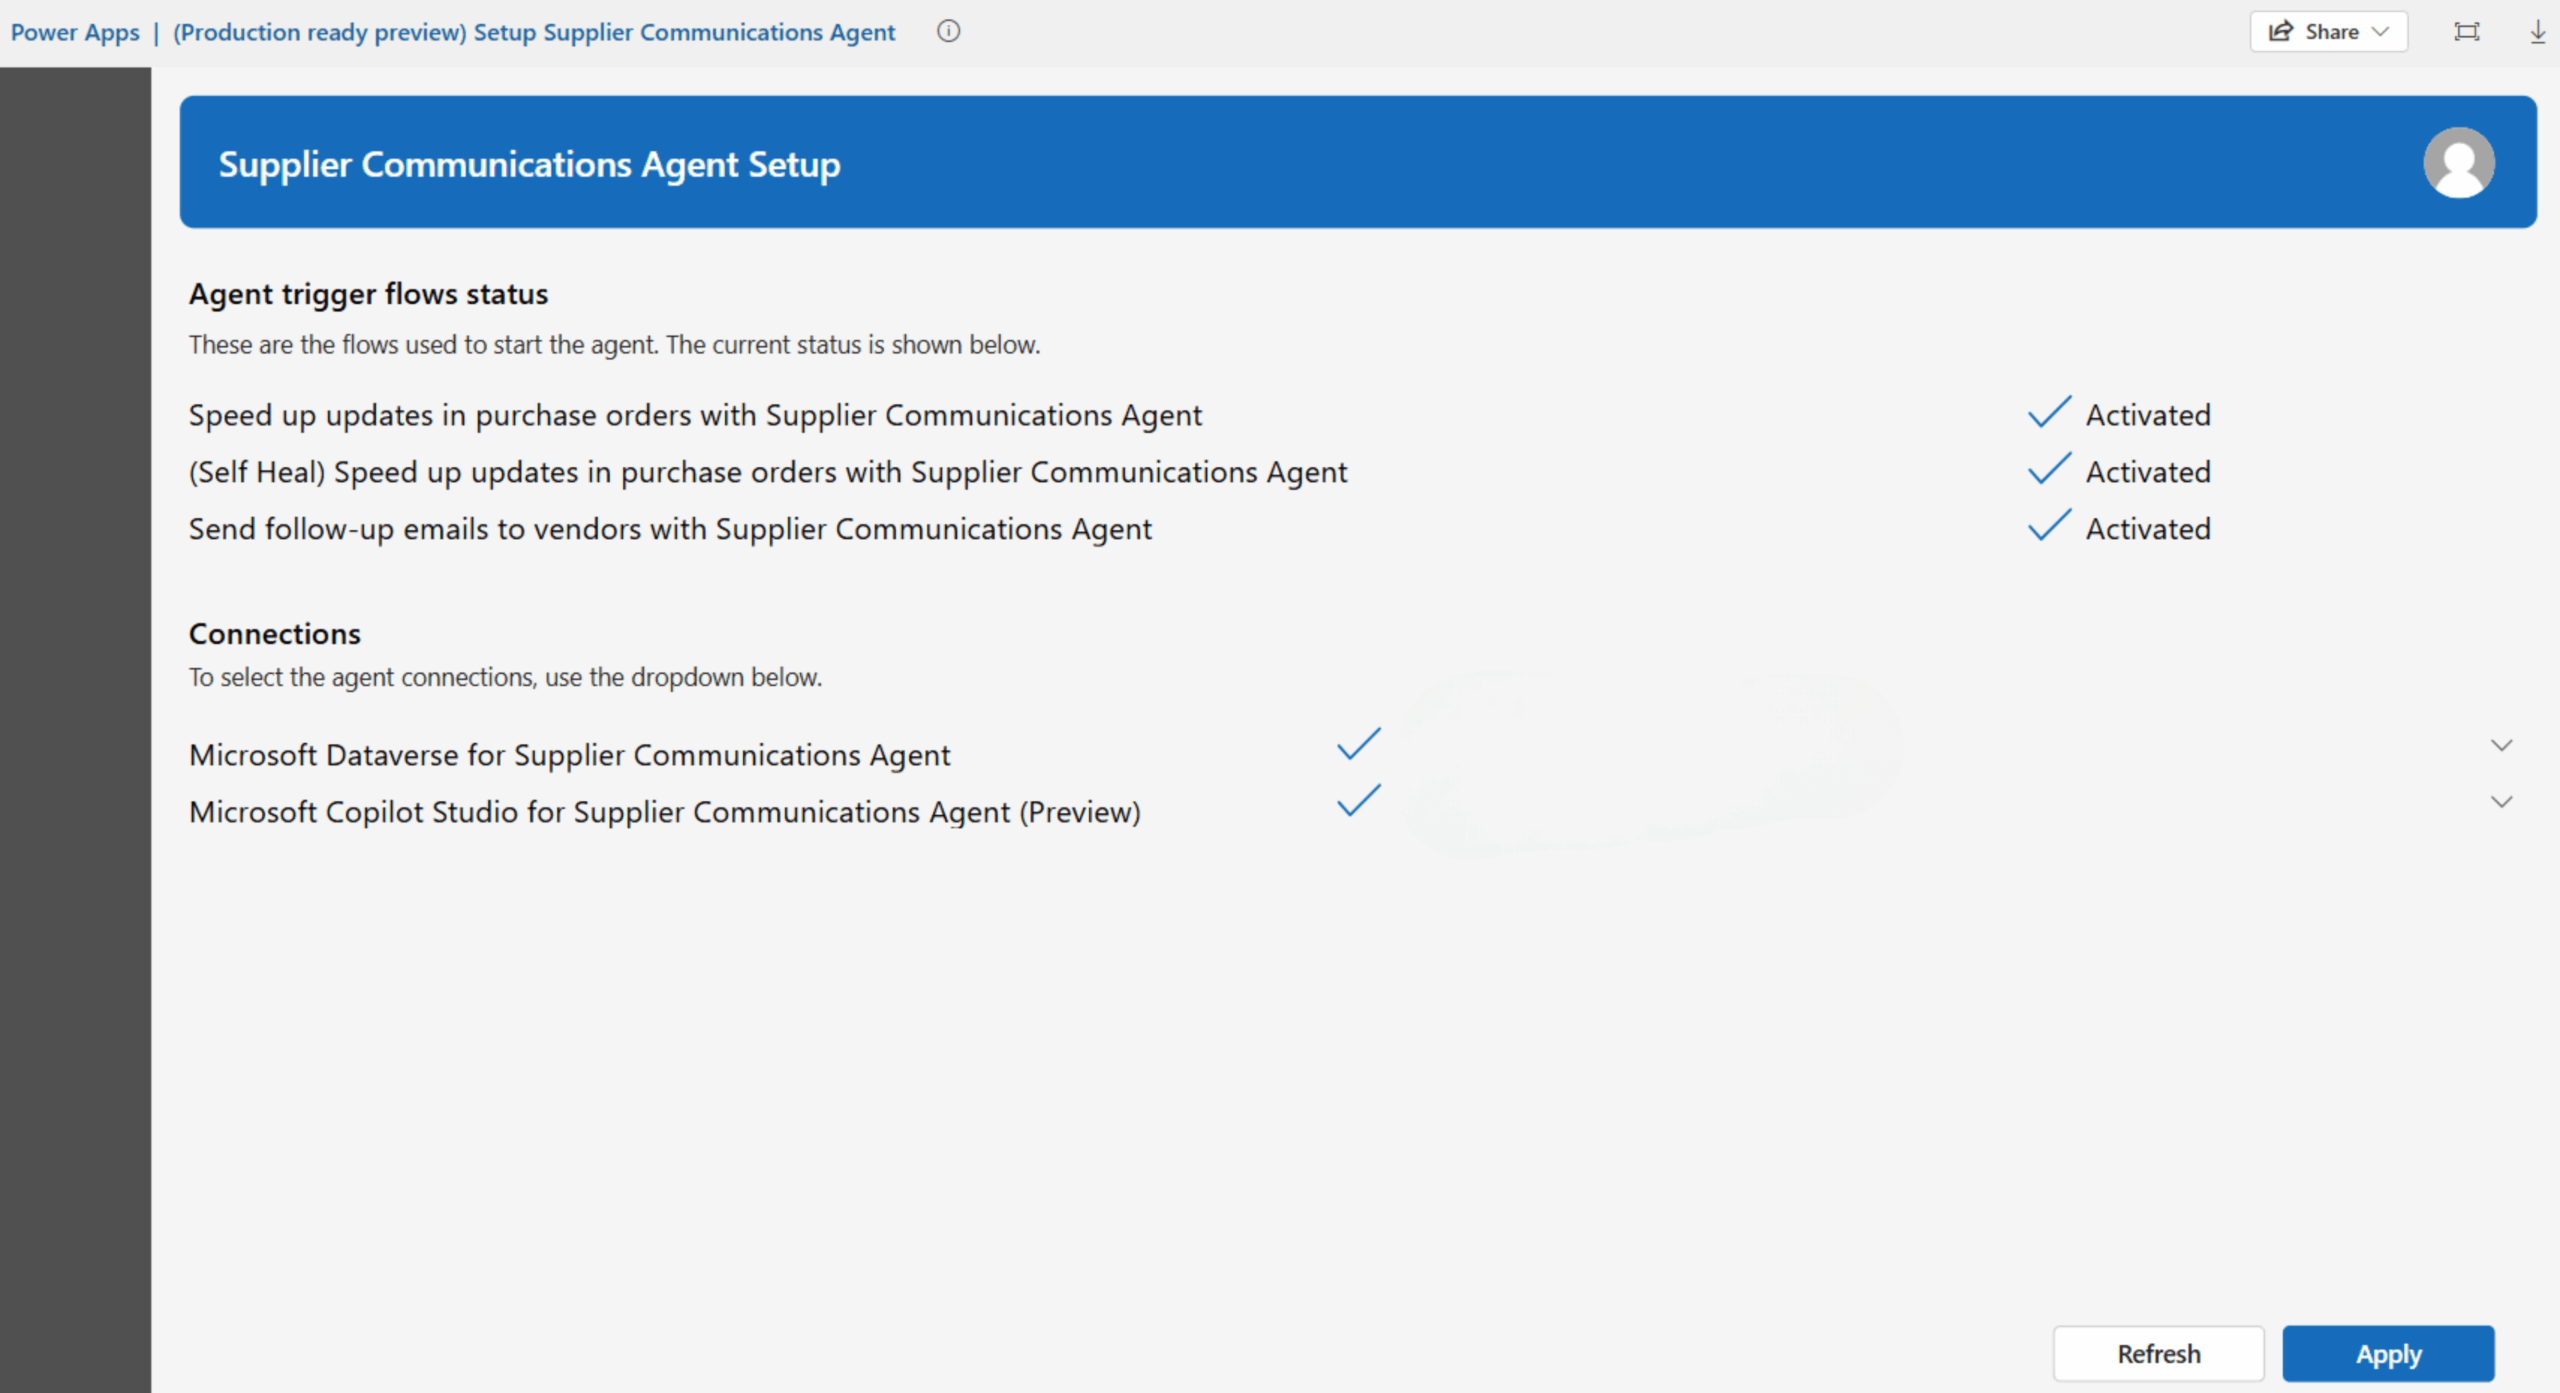
To finish setting up the agent identity, you must activate the triggering Power Automate flows. A Canvas app is provided to help you do this. To use the app, follow these steps.
1. Sign in to Power Apps as an environment administrator user.
2. In the left pane, select Apps.
3. Select the app with a Name of Setup Supplier Communications Agent.
4. On the command bar, select Play.
5. Under Connections, select the connections you created in the previous section for both Microsoft Dataverse and Microsoft Copilot Studio.
6. Select Apply at the bottom-right of the page and wait for all of the flows listed under Agent trigger flows status to switch to a state of Activated.
Set Up a Private Mailbox
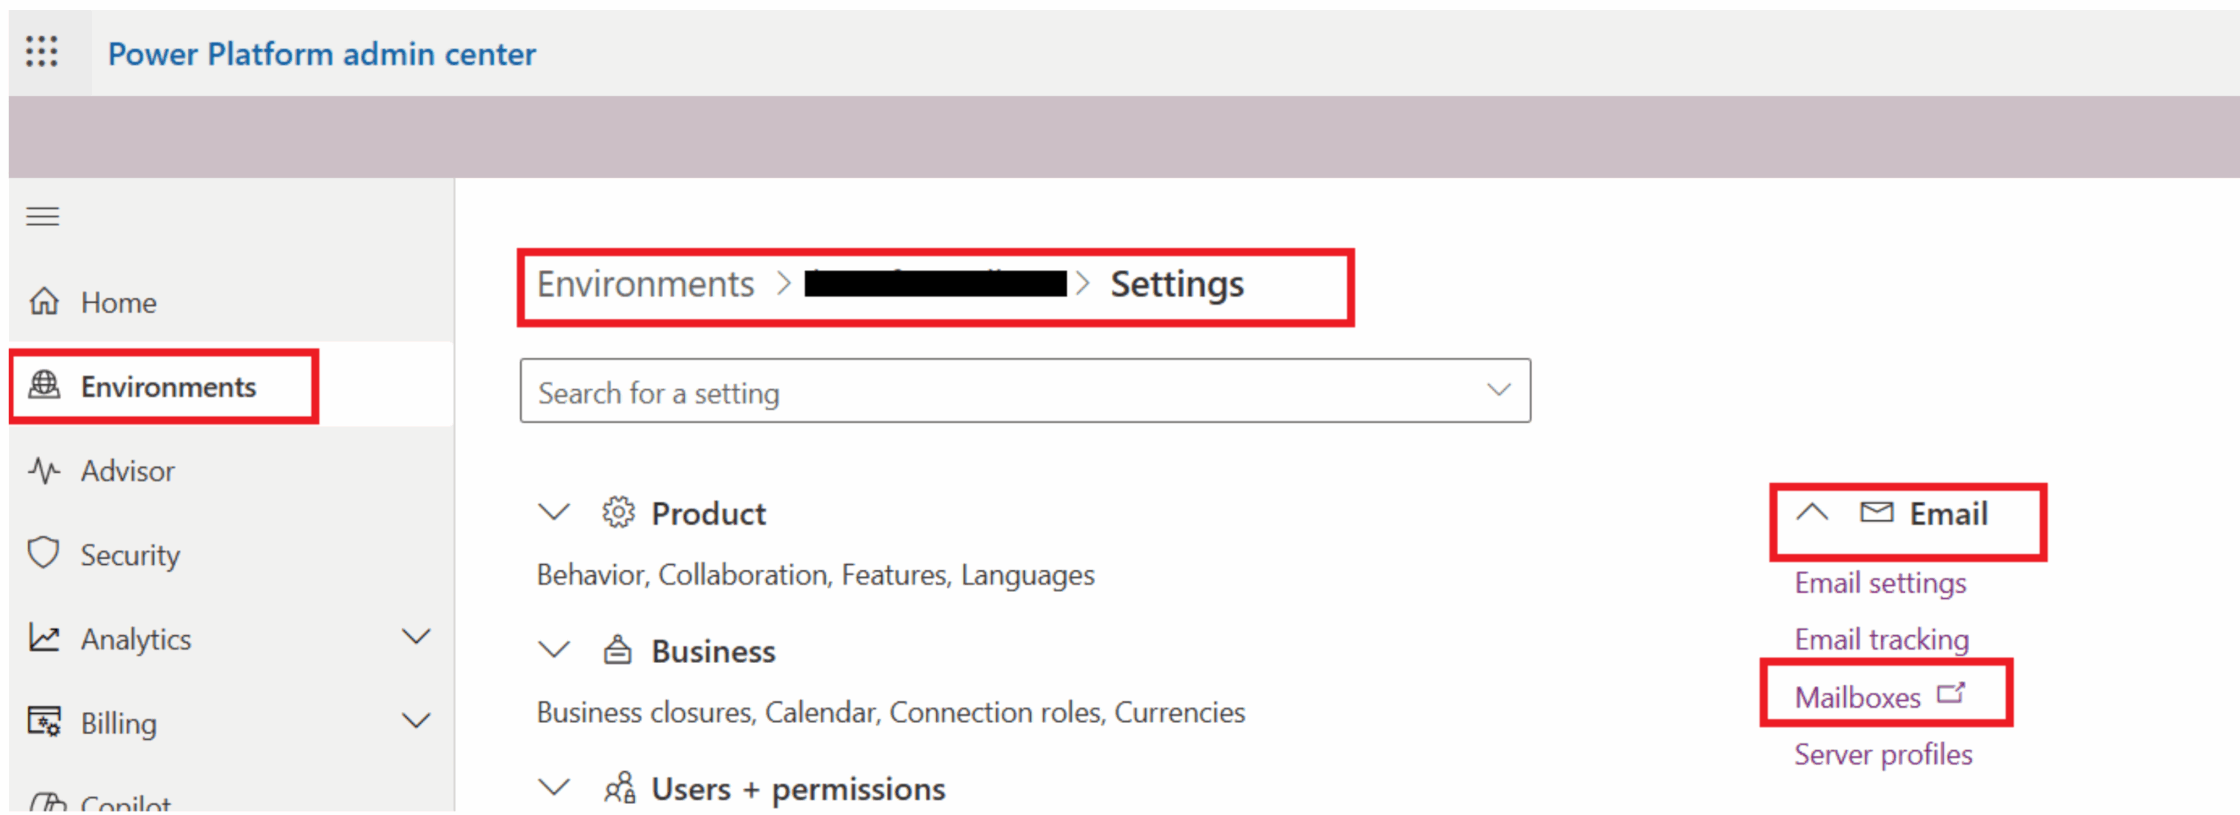
1. Sign in to the Power Platform admin centre as a user who has a system administrator security role. (Although users who don’t have an administrator role can enable synchronization for their own mailboxes, administrator approval might be required.)
2. Select the environment that you want to set up.
3. On the command bar, select Settings.
4. On the Settings page, under email, select Mailboxes.
5. On the Select a view dropdown menu at the top of the page, select Active Mailboxes.
6. Select the checkbox for each mailbox that you want to use with the Supplier Communications Agent.
7. On the command bar, select Test & Enable Mailbox to enable synchronization for the selected mailboxes.
Flows for Dynamics 365 Supplier Communications Agent Use Cases
To create the agents. Goto > Agents > Agents (Preview) and follow the following steps to enable the respective agents.
1. Follow-Up on Unconfirmed Purchase Orders
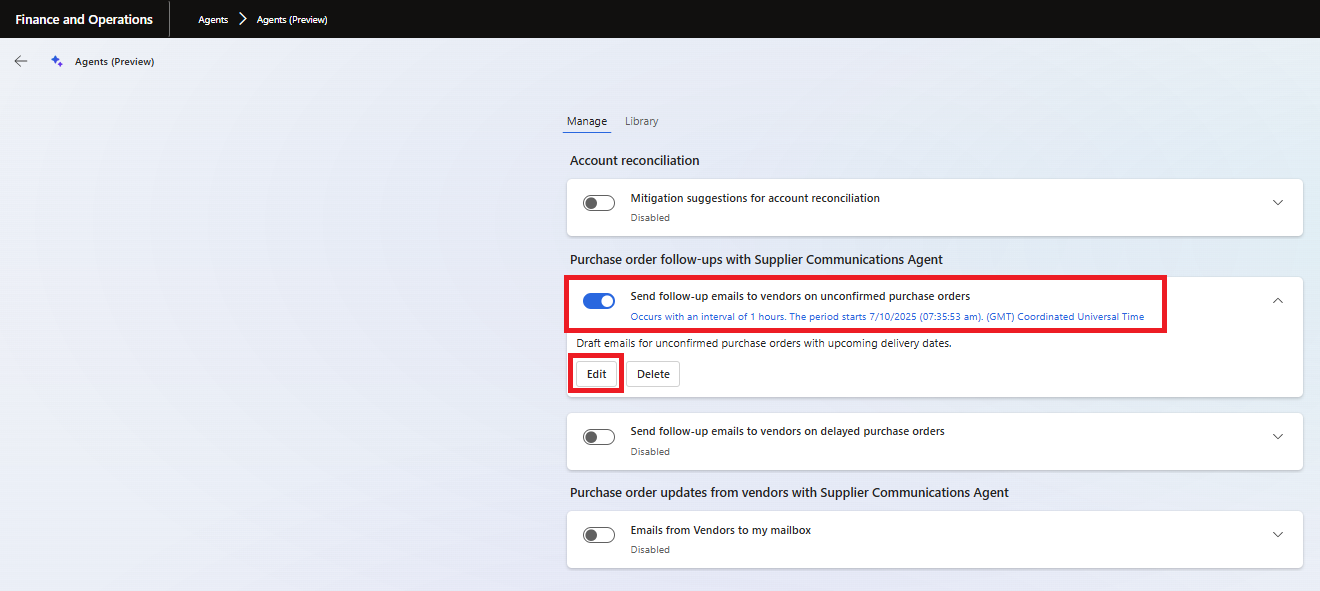
• Enable the toggle “Send follow-up emails to vendors on Unconfirmed Purchase Orders”
• Click on Edit: to configure the email, conditions and criterias.
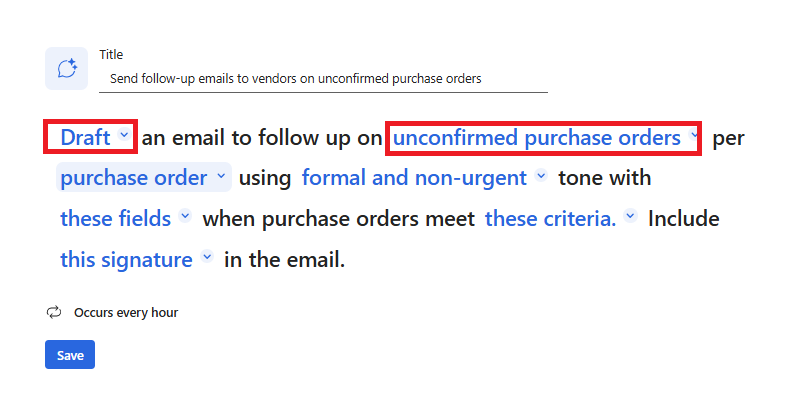
• Click on the Draft drop down and set the agent should send the emails automatically or to create a draft.
• Set the agent for Unconfirmed Purchase Orders.
• Define whether agent should check the orders based on the per purchase orders or per vendor.
• Set the tone of the email, by default there are few combinations to try, select any.
• In “these fields”, select the fields that the agent should consider drafting or send an email.
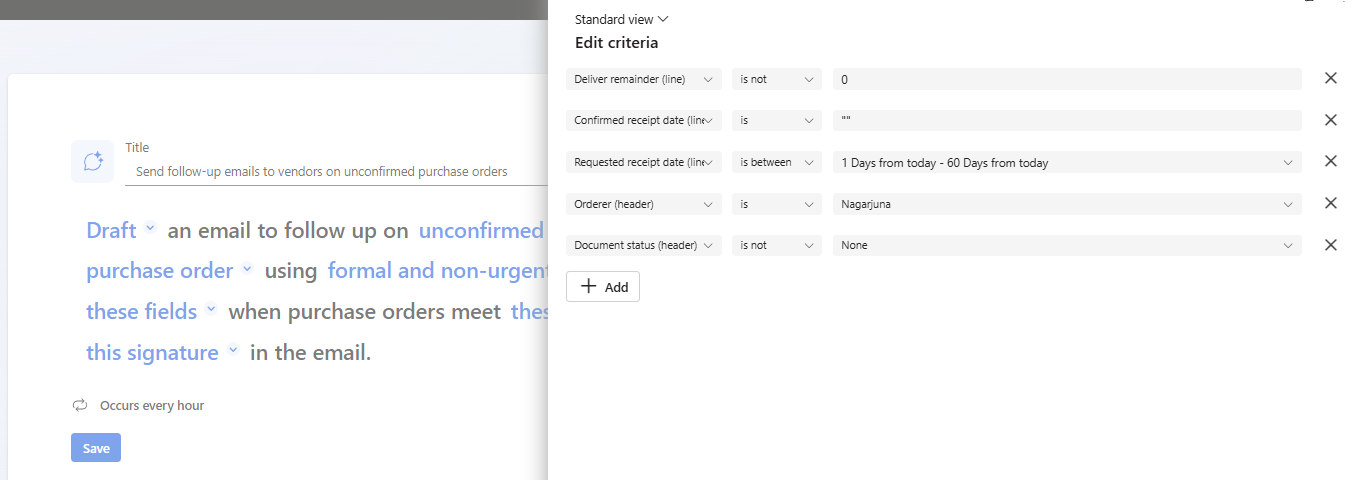
• In “these criteria”, set the following criteria as it is in the below image or define your own criteria.
Following is the Flow:
Step 1: The procurement team sends a purchase order (PO) to a supplier
Step 2: The Supplier Communications Agent monitors the status of the PO
Step 3: If the PO remains unconfirmed after a specified period (e.g., two days), the agent automatically generates a draft follow-up email based on predefined criteria.
Step 4: The procurement personnel review the draft email
Step 5: The procurement personnel either send the email directly or adjusts before sending
Below is the sample agent response for the above set up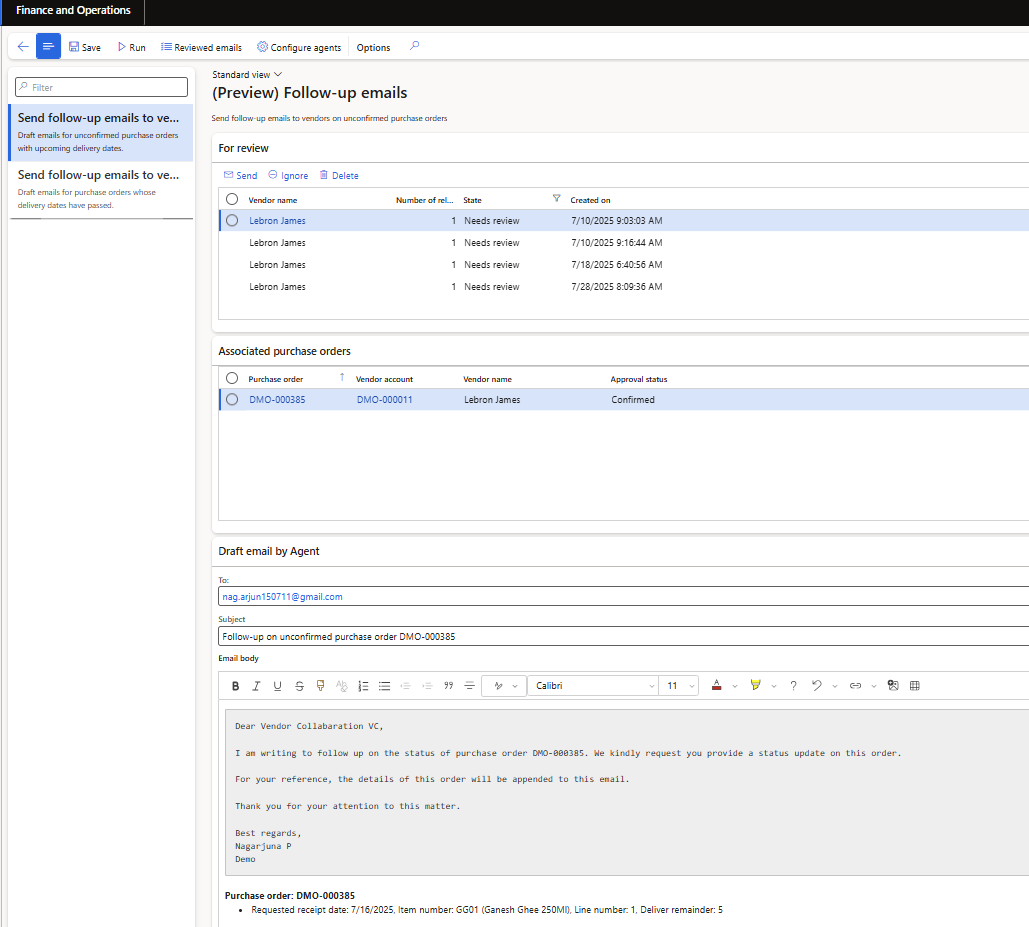
2. Follow-Up on Delayed Orders
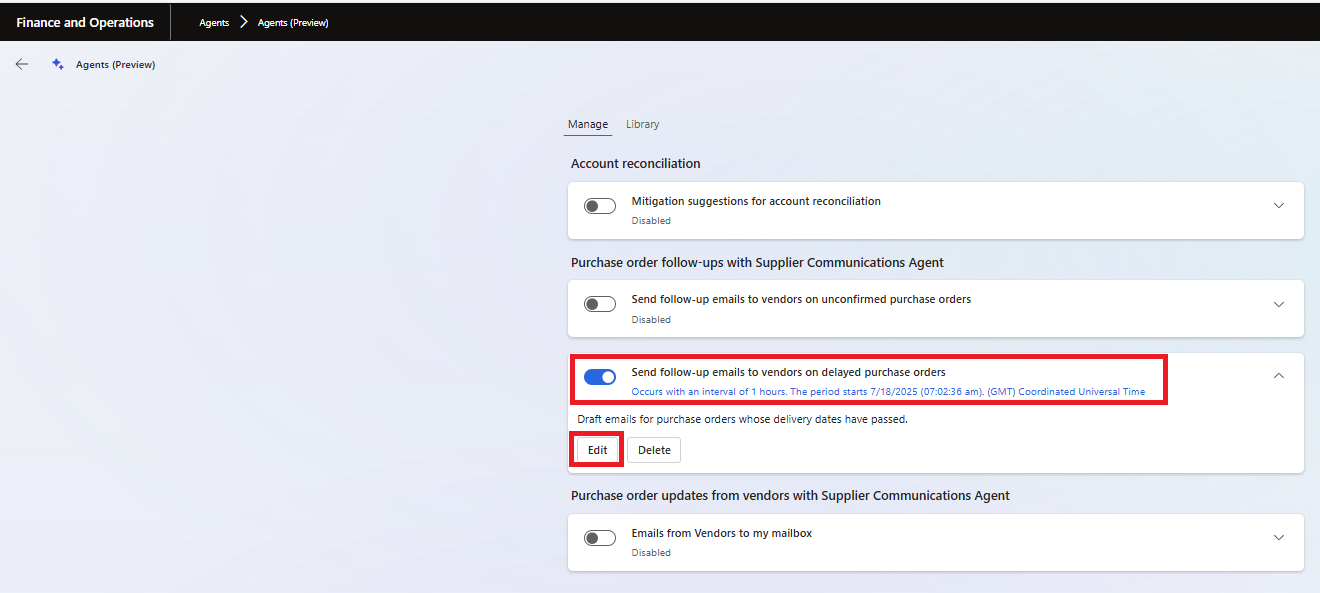
• Enable the toggle “Send follow-up emails to vendors on Unconfirmed Purchase Orders”
• Click on Edit: to configure the email, conditions and criteria.
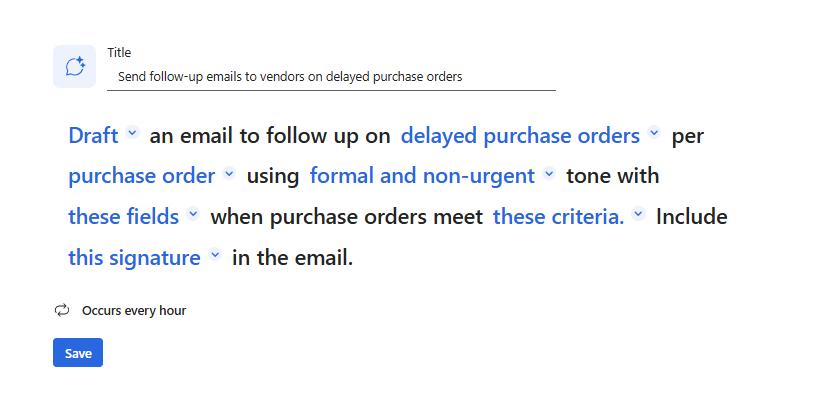
• Click on the Draft drop down and set the agent should send the emails automatically or to create a draft.
• Set the agent for Delayed Purchase Orders.
• Define whether agent should check the orders based on the per purchase orders or per vendor.
• Set the tone of the email, by default there are few combinations to try, select any.
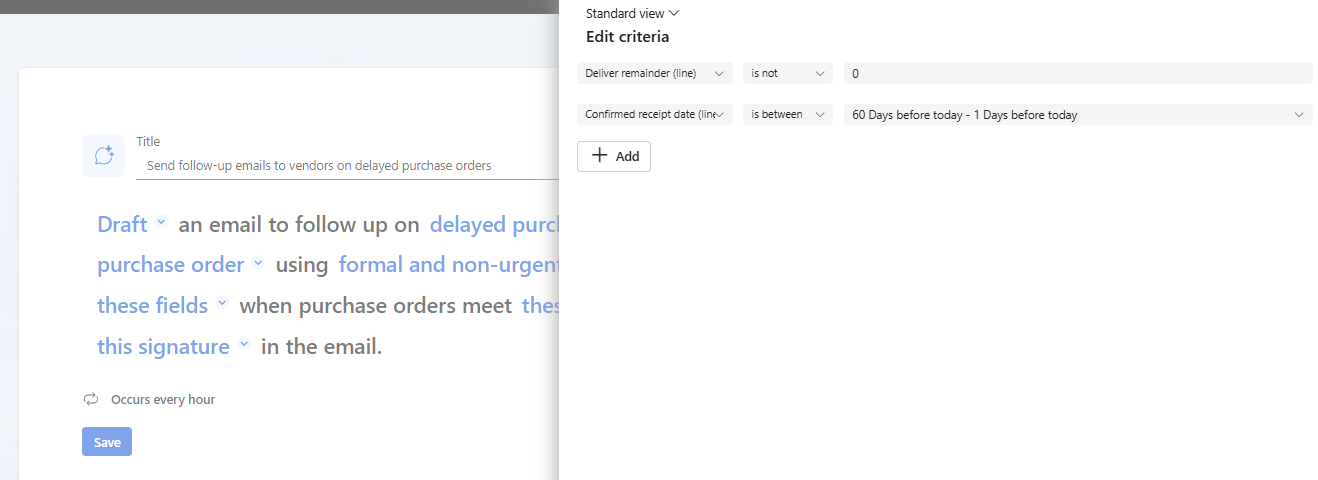
• In “these fields”, select the fields that the agent should consider drafting or send an email.
• In “these criteria”, set the following criteria as it is in the below image or define your own criteria.
Following is the Flow:
Step 1: The procurement team identifies a delayed purchase order.
Step 2: The Supplier Communications Agent monitors the status of the delayed order.
Step 3: If the order remains delayed after a specified period, the agent generates a draft follow-up email to the supplier.
Step 4: The procurement personnel review the draft email.
Step 5: The procurement personnel either send the email directly or adjusts before sending.
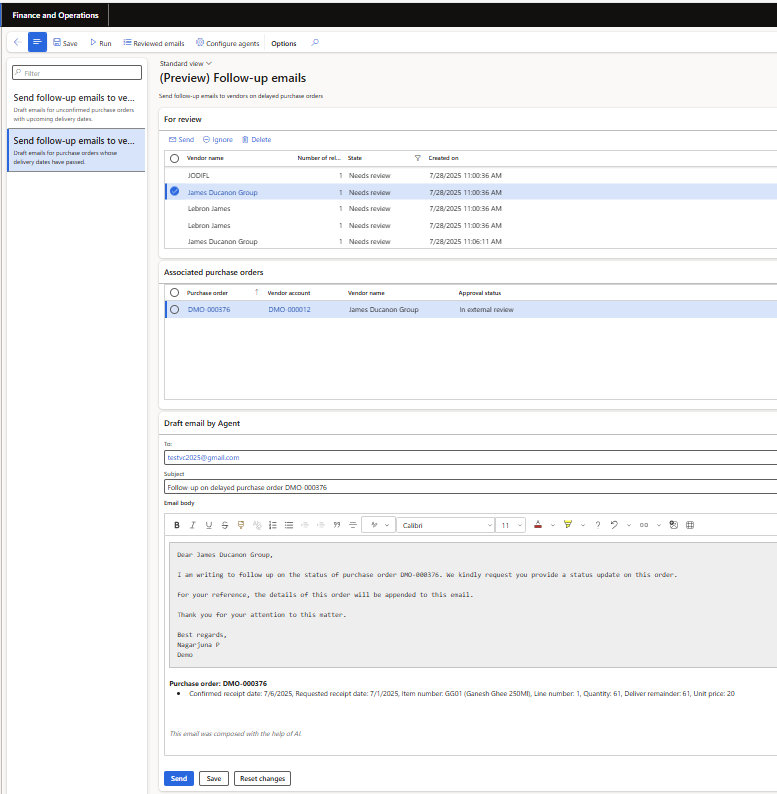
Below is the sample agent response for the above set up.
3. Processing Supplier Confirmations & Change Requests
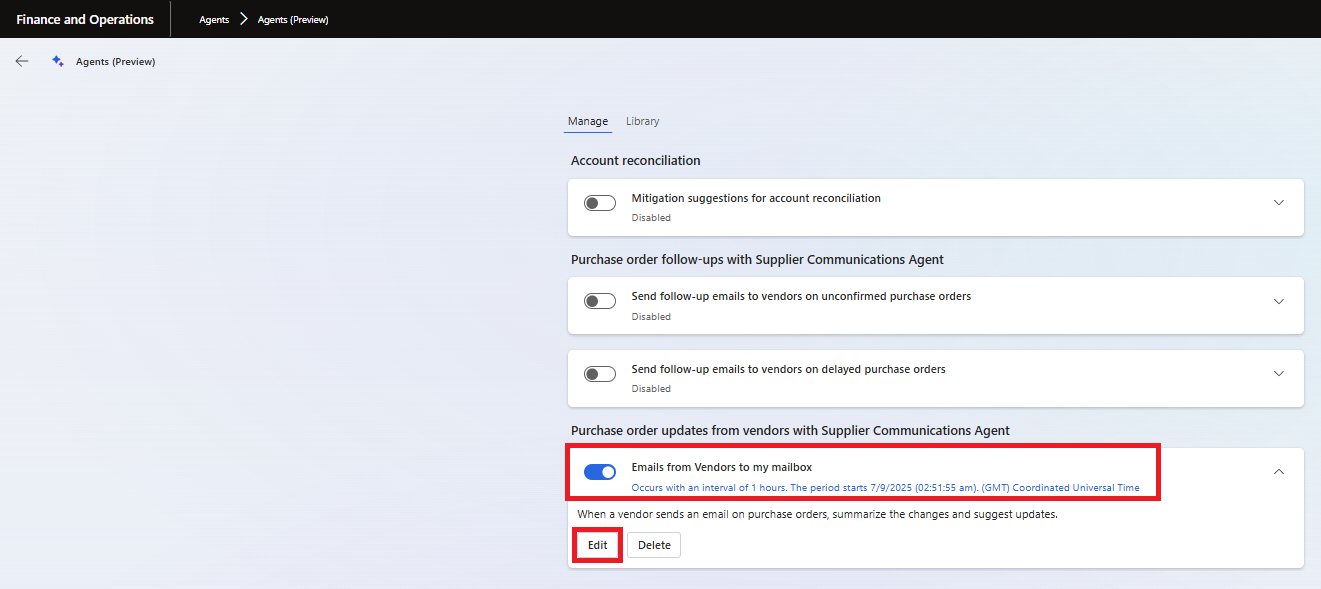
• Enable the toggle “Send follow-up emails to vendors on Unconfirmed Purchase Orders”
• Click on Edit: to configure the email, conditions and criteria. (Ignore the warning)
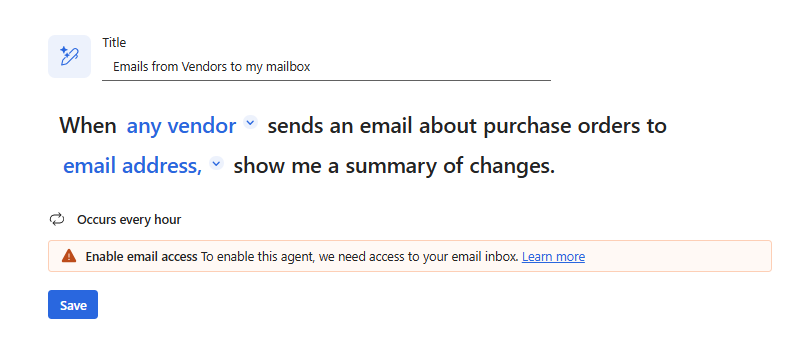
• Select “any vendor” or a “specific vendor” from the drop down.
• Select the shared mailbox or personal mailbox, where the mail from vendors is received (agent will read the mails from the defined mail ID). (Ignore the warning message in the above screenshot).
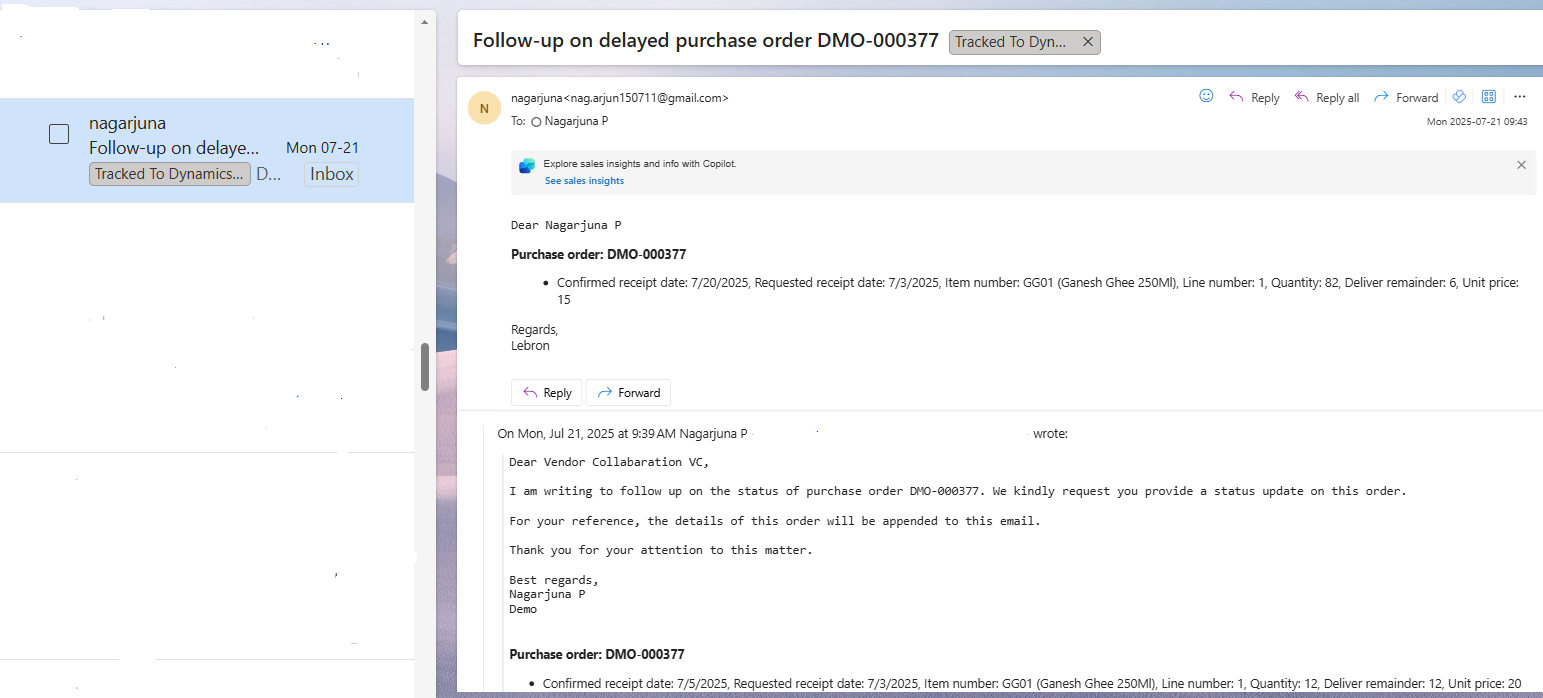
• Above is the sample of the mail that agent reads, when Vendor send an email with response on confirmation or changes.
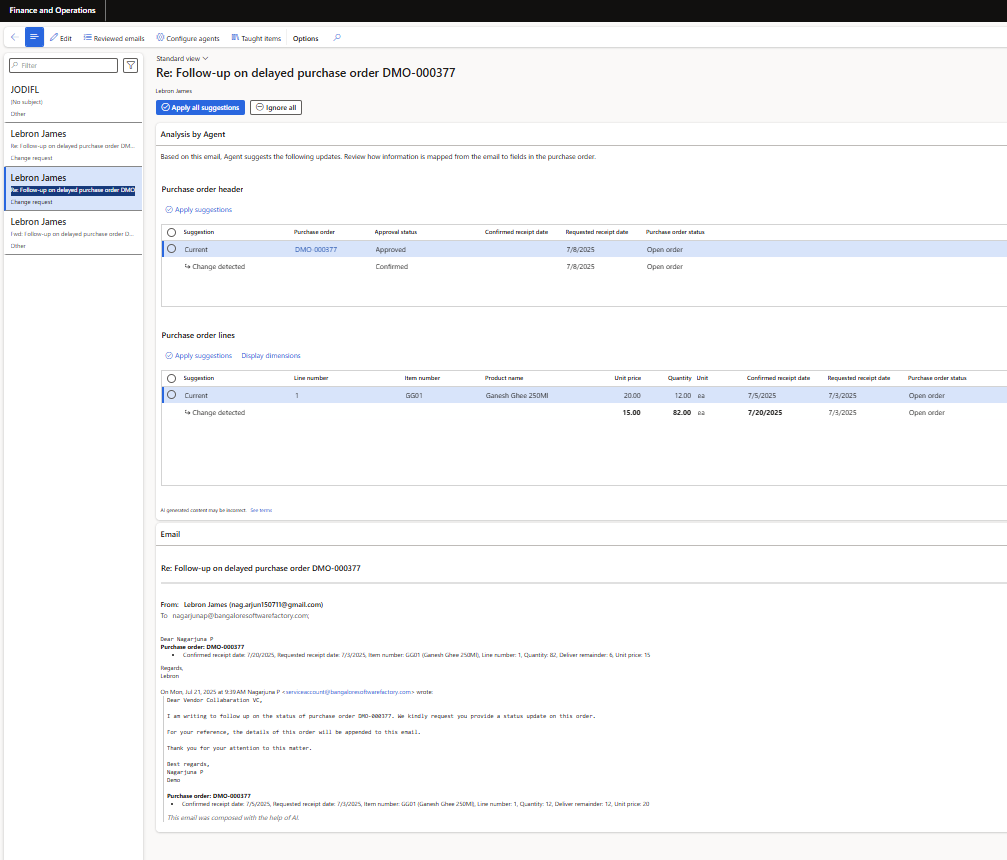
• After reading the mail received from the vendor, Agent detects for the changes and the same will be showed in the agent screen, upon clicking on “apply all suggestions”, all the changed will reflect in the purchase order automatically.
Following is the Flow:
Step 1: The supplier sends an email regarding a purchase order, which may include a confirmation or a request for changes.
Step 2: The Supplier Communications Agent reads the email and extracts relevant information, such as confirmation details or requested changes.
Step 3: The agent summarizes the extracted information and presents it to the procurement personnel.
Step 4: The procurement personnel review the summary and decides whether to accept or reject the confirmation or requested changes.
Step 5: If accepted, the agent updates the purchase order in the system with the confirmed or revised information.
These flows illustrate how the Supplier Communications Agent automates and streamlines various procurement processes, enhancing efficiency and accuracy in supplier communications.
Currently agent supports: Quantity, UOM, Price, Confirmation, Delivery date and cancellation.

